


Introduction
This post is a continuation of our Amazon Elastic Container Server (ECS) Series outlining the best practices towards running containers within AWS. If you haven’t already, give our ECS overview post a read here before continuing with this one.
In our last blog post, we discussed the available options of deploying containers to AWS using Amazon Elastic Container Server and explored the served and serverless options for this. An important aspect, and arguably the main ingredient, to hosting anything on the Cloud is deploying updates utilising techniques which mitigate deployment risk.
This blog post will follow the Serverless AWS Fargate path to automate the deployment of containers whilst utilising immutable infrastructure to allow for sufficient rollback time frame if things don’t go as planned.
Deploying Containers
Thousands of pre-baked containers are readily available from services like DockerHub including base images for operating systems, databases, servers, and applications. These images can be pulled and deployed into Amazon ECS and AWS Fargate by referencing their tags.
Automating the build and deployment of docker containers can be achieved by utilising a variety of services umbrellaed under AWS Codepipeline. AWS CodePipeline is a fully managed continuous delivery service, automating the source via AWS CodeCommit, built via AWS CodeBuild, and deployment via AWS CodeDeploy.
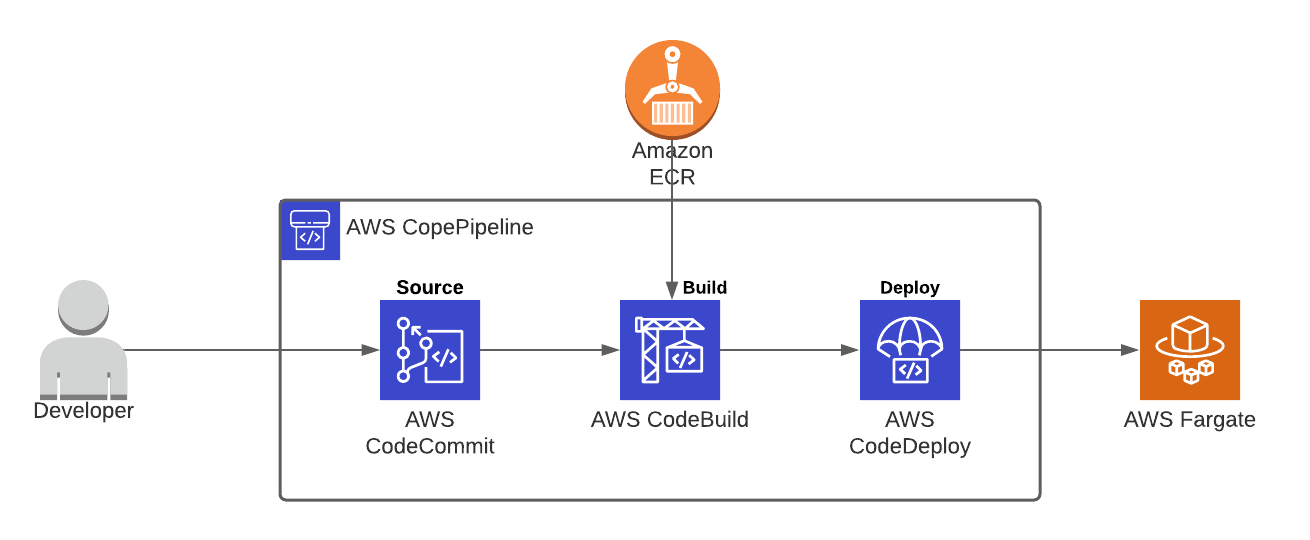
Source – AWS CodeCommit
AWS CodeCommit is a fully managed source controlled git based repository. CodeCommit makes it easy for team collaboration eliminating the need for customised source control methods or external git repositories integrations into AWS such as GitLab or GitHub.
CodeCommit can be used to store our customised Docker container source code including our dockerfile.
Build – AWS CodeBuild
AWS CodeBuild is a fully managed service which compiles source code, runs tests, and builds application packages which are ready to deploy. Codebuild pulls application source code from the source (CodeCommit) and builds a container using instructions defined in a build specification file (buildspec.yml) stored within the source.
 pre_build:
    commands:
      - echo Logging in to Amazon ECR...
      - $(aws ecr get-login --no-include-email --region $AWS_DEFAULT_REGION)
  build:
    commands:
      - echo Build started on `date`
      - echo Building the Docker image...
      - docker build -t $IMAGE_REPO_NAME:$IMAGE_TAG .
      - docker tag $IMAGE_REPO_NAME:$IMAGE_TAG $AWS_ACCOUNT_ID.dkr.ecr.$AWS_DEFAULT_REGION.amazonaws.com/$IMAGE_REPO_NAME:$IMAGE_TAG
  post_build:
    commands:
      - echo Build completed on `date`
      - echo Pushing the Docker image...
      - docker push $AWS_ACCOUNT_ID.dkr.ecr.$AWS_DEFAULT_REGION.amazonaws.com/$IMAGE_REPO_NAME:$IMAGE_TAG
The build specification file outlines the steps which are taken during pre-defined stages of the build. As seen above CodeBuild initially logs into Elastic Container Registry (ECR) during the pre-build stage – this step allows a container image to be pushed to ECR upon build completion. The container is then built to specifications defined within the dockerfile. Finally, the container image is named, tagged and pushed to ECR for storage.
Deploy – AWS CodeDeploy
AWS CodeDeploy manages the deployments to services such as EC2, Lambda, On-Premise servers and AWS Fargate. In the aforementioned stages, the source has been retrieved and container built and pushed to ECR. The final step is to instruct ECS to pull the newly created image from ECR and deploy it to AWS Fargate. An Application Specification file (appspec.yml), stored within the source, is obtained by codedeploy with instructions to coordinate deployment to ECS.
version: 0.0
Resources:
  - TargetService:
      Type: AWS::ECS::Service
      Properties:
        TaskDefinition: "arn:aws:ecs:eu-west-2:998877445566:task-definition/cirrushq-task-definition:1"
        LoadBalancerInfo:
          ContainerName: "CirrusHQApplication"
          ContainerPort: 8080
The most basic Application Specification file, as highlighted above, contains information on where a docker image should be deployed, what task definition, and version it should use, the container name and host port. However, more detailed configurations can be defined such as network configuration – subnets, security groups, and VPC, plus the hooks to execute scripts at each stage of deployment.
Deploying containers to ECS has no shortage of deployment types from canary deployments orchestrated by CodeDeploy to Rolling Updates and Blue/Green deployments managed by ECS itself. Each of these deployment types have their use cases, pro’s and con’s. From personal experience, I typically choose to use Blue/Green Deployments.
Why Blue/Green Deployments?
Blue/Green deployments allow for a zero downtime deployment experience due to it’s instant rollback capabilities. Unlike its counterparts which require instances to be rolled back gradually, Blue/Green runs two versions of the application in parallel environments (for a given time period) allowing traffic to be shifted and seamlessly rolled back to the previous version.
This is achieved by creating an entirely separate environment when a new version of the application is released. In traditional served environments a new auto-scaling group is created behind an application load balancer. Whereas, using serverless architecture such as Fargate utilises target groups to control the weight of traffic going to each environment.
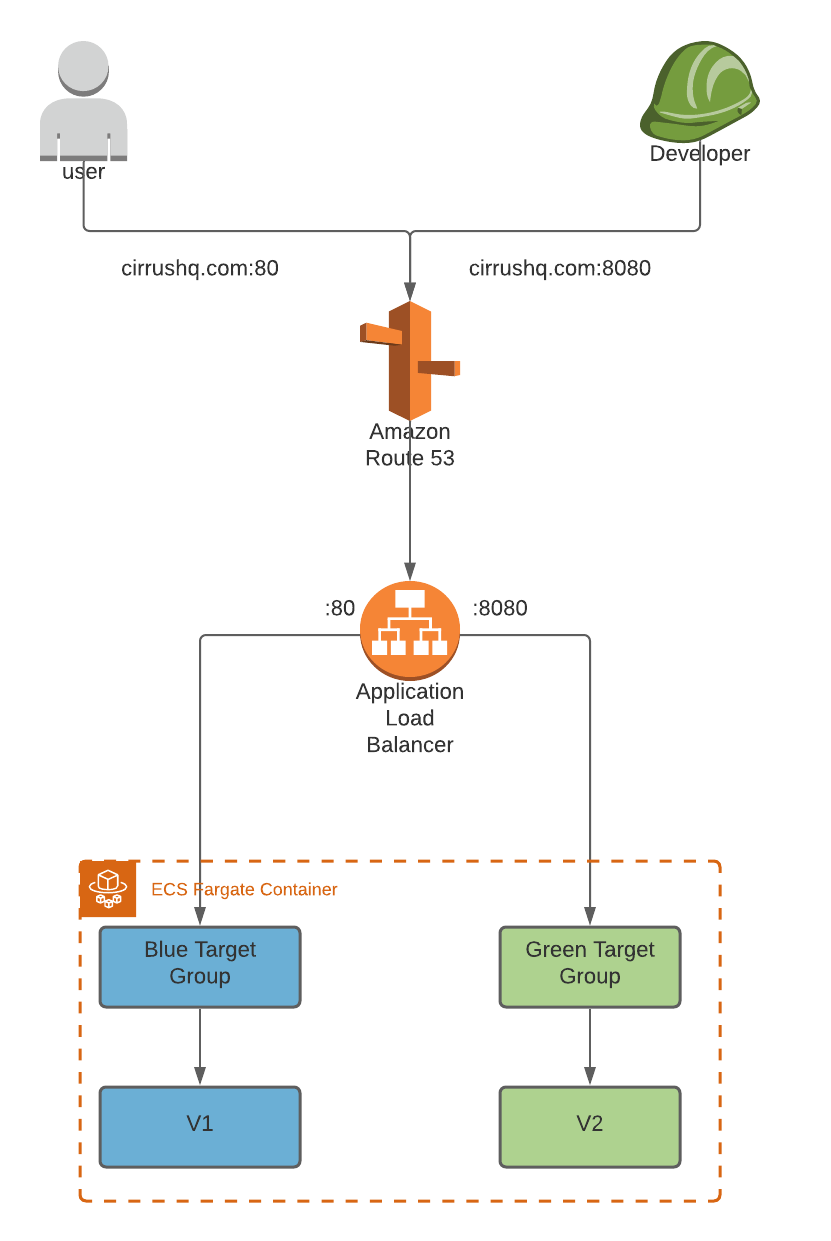
The current production environment (v1) of our application resides within the blue environment with user traffic balanced by the application load balancer and blue target group via port 80. Upon a new version or feature release (v2) a new green environment is created entirely segregated from the current production blue environment.
A test listener, defined within ECS Service configuration, defines which port test traffic and developers can access the new version of the application. Health checks monitor the status of the new deployment and production traffic is incrementally shifted to the new version. If health checks fail and errors arise, the production traffic is shifted and rolled back to the initial blue environment with zero downtime. Otherwise, a wait period is initiated ensuring that the new version is stable before the blue environment is terminated and the green environment is promoted to the new production blue environment.
Depending on the application a few considerations on whether Blue/Green is the right deployment method to meet your needs. Maintaining user sessions during a new version release is critical to preserve user activity whether a deployment is successful or roll’s back to its previous state. Storing session data in external services such as ElasticCache’s MemCached ensures users data persists regardless of which version they are accessing.
Deploying database schema changes require extra consideration and planning as both the old and new versions persist at the same time. For example, renaming a column such as firstname to forename may seem like a simple change but the front-end application may be inconsistent with the schema change if the column is simply renamed. To overcome this, both versions of schema must persist in the newly deployed database. Therefore, the application can successfully retrieve the data regardless of which version is live.
CirrusHQ has a breadth of knowledge on deploying, running, and supporting workloads using Containers on AWS. If you would like to find out more from CirrusHQ regarding your container deployments, feel free to contact us via our contact page.